Howto: Panning

Those nice to know things about your DSLR will be found here. How to do this, and why you probably should not do that.

Moderators: Greg B, Nnnnsic, Geoff, Glen, gstark, Moderators

Forum rules
Please ensure that you have a meaningful location included in your profile. Please refer to the FAQ for details of what "meaningful" is. Please also check the portal page for more information on this.

Howto: Panning

Postby rmp on Thu Jul 20, 2006 11:29 pm

A pan shot results in an image where the subject is sharp but the background is blurred as the photographer trains the lens on a subject as it moves past. The subject is stationary or nearly stationary relative to the photographer, but the background moves and hence the blur.

Elements of the subject may be blurred, for example wheels on a car, legs on a person but most of the subject is sharp.

Image

Pan shots are useful to convey a sense of movement. They can also be used to capture fast-moving subjects in poor lighting conditions as the shutter speed required is necessarily relatively slow.

There are many variations of pan shots. You don't need a very fast moving subject, or a long lens. But to begin with we'll explain the basic pan shot for a vehicle where it is moving quickly and in a straight line.

Everything below can be varied and there are other ways of focusing for example, but if you want somewhere to begin use these settings.

What you need
1. Somewhere where the car can travel in a straight line at a constant speed, and you can see it well before it passes in front of you.

2. Background. It will be blurred so minor details will be lost but you don't want anything too obvious like a promiment roadsign as a distraction. Some background behind the car, for example trees is good otherwise there will be less sense of movement.

Taking the shot

A. Set your shutter speed to 1/80 sec. ISO to 100 or 200. The fastest burst mode your camera can manage.

B. Have the driver stop the car directly in front of you. Adjust the zoom so the car has about 2/3 of its length before and after it in the frame. Then note the zoom and leave it at that.

1. To begin with stand about 50m away from the road. Have the driver drive about 1km down the road, turn around (somewhere safe) and then accelerate to 80kmph well before they pass in front of you. This gives both you and the driver time to settle in. You can leave the last-minute pan shots till later.

Warn the driver photoshoots are boring, not glamourous. A pair of UHF radios is very useful

2. Select centre focus and pre-focus on the road immediately in front of you, and hold the focus (depress shutter halfway).

3. Swing the camera back to the direction of where the car is coming from. You should pick up the car at around a 45 degree angle of travel to where it will pass directly in front of you.

4. It's like a golfer's swing, or a pool shot. Smooth, gentle, follow-through. Find the car in the viewfinder and track it. Do not adjust zoom or shutter. Keep the car centred.

5. As the car comes through about 30 degrees hit the burst mode and gently follow through beyond the point at which the car is directly in front of you. You should still be taking frames as the car passes in front.

That's it! You should now have several frames, of which one or two will be usuable. Expect to throw the rest away.

Further experiments:

- try shutter speeds of 1/60 and 1/125
- move closer in and use say a 30mm zoom. Use a shutter speed of 1/30
- move further out and use a 100mm lens and 1/100th


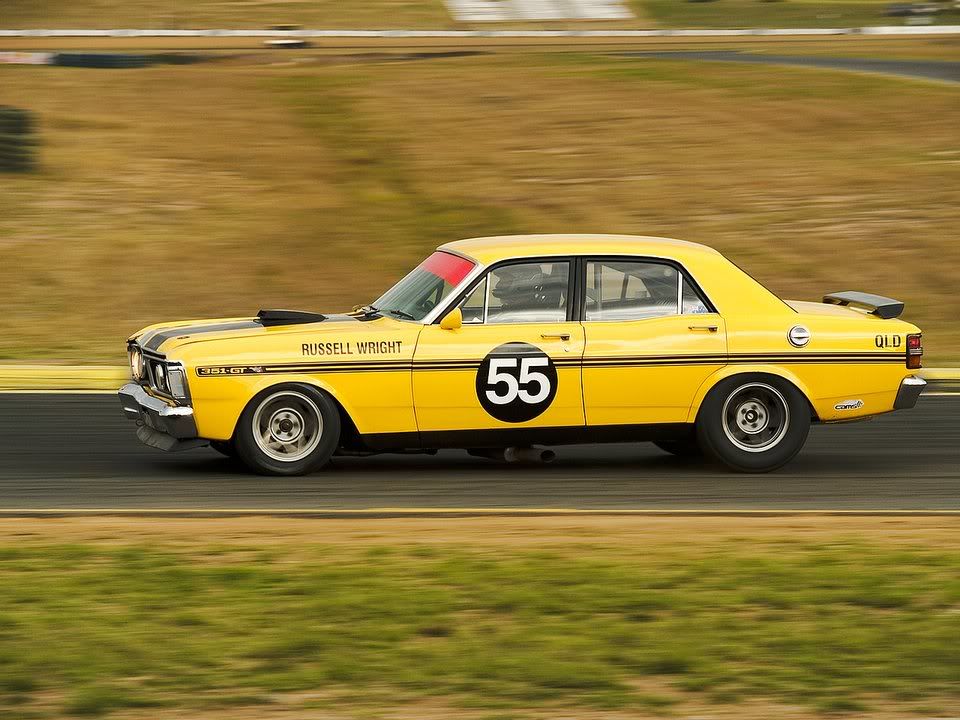
This is not an ideal background as it is too far away. Nevertheless, the car is sharp. A dirt road also throws up a little dust which adds to the sense of movement.

Image

You don't need a clear view of a vehicle for a decent shot. The trees make an interesting frame in this one. But there is no way you'd get that precise a shot without a good frame rate.

Image

A straightforward pan shot.

Image

Car position in the frame
Any moving-subject photograph tends to work best if there is space behind the subject and slightly more in front. It is very difficult to measure this as a car flies by, so erring on the side of caution by zooming out is best. Then you can crop to best effect, and it also makes the pan easier. In the days of 8Mp+ cameras the final image is still large and usuable.

Focus
There are many focus techniques for panning. The simplest is described above, which is pre-focus on where the car will pass by in front of you, and pan with it. Pre-focusing means pointing the camera at the point you want to photograph to be taken, pressing the shutter halfway and keeping it there.

You could also manually focus and that would remove the need to keep your finger halfway on the shutter button. But then you have to switch the lens between auto and manual focus and if you are covering a motorsport event that could be valuable time.

It is also not strictly necessary to pre-focus. DSLRs are quick enough to focus and shoot. However, P&S users will certainly need to pre-focus as their focusing systems are far slower, as is the frame rate.

Which focus point to use? Centre will work, as will whichever one is on the side of the frame in the direction of travel.

AF-C and Ai-Servo modes. These can work too but the problem is that they are designed for subject moving relative to you at a constant speed. They shift the focus to pre-empt where the subject will be.

A car passing you at right angles is not approaching at a constant speed. THerefore, they can be fooled and produce worse results than using normal burst mode.

Shutter Speed
There is no single answer. It depends on what effect you are trying to achieve. Here are the tradeoffs:

- slower shutter speed is more blur, but harder to handhold
- a longer lens will require a quicker shutter speed
- the slower the vehicle, the longer the shutter speed for blur

If the intention is to demonstrate some sense of movement then you generally do not need very slow shutter speeds such as 1/30.

In this shot the vehicle is travelling at less than 20kmph. The shutter speed is 1/50 and the focal length is 38mm. The pan had to be diagonal as the vehicle was ascending a hill.

Image

A slower shutter speed could have been used but that would have blurred the background too much for my liking. I wanted a sense of a forest, not a complete green mess. A slower speed would have made the shot even more difficult. Imagine this shot with say 1/500th. The vehicle would appear to be staionary.

Standing far away was not an option. Too much forest in the way. So the shot had to be a close-range pan. This frame was taken on the third and final run.

The only problem with this shot is the stray bit of grass over the rear wheel. However, that could be edited out if required.

Panning isn't just for vehicle shots either. It is a useful technique with all sorts of moving subjects, including Santas on flying foxes.

Image

Lens length
The further away you are from the subject:
- the fast the subject needs to move to achieve blur
- the longer the lens required, and that means a shorter shutter speed to avoid camera shake
- if the subject is a long one (a vehicle as opposed to a person) then more of it will be in focus. A short-range pan shot will not have all the vehicle in focus. This is sometimes desirable. Contrast these two shots:

Image

Image

The white Landrover was shot using a 75-300 at around 90m away. Almost all the vehicle is in focus. The blue Nissan was shot from around 15m away, and while the shot is not entirely sharp the difference in sharpness between the front and rear of the vehicle is apparent. This is due to the short lens used, a 24-70.


This shot is fine apart from the lack of positioning in the frame. Err on the side of caution, you can always crop to suit but you can't add extra background in as easily.

Image

This is a better shot:

Image

Panning and Curves
Panning is easier if the subject is moving on the radius of a circle with the photographer at the centre. This is because the distance from the photographer to the subject is fixed. Conversely, if you are standing on the outside of a bend them panning becomes more difficult, but not impossible.
Last edited by rmp on Thu Jul 27, 2006 9:04 pm, edited 3 times in total.
rmp
Member
 
Posts: 161
Joined: Mon Mar 27, 2006 8:29 pm
Location: Western side of Melbourne

Postby ozczecho on Thu Jul 20, 2006 11:43 pm

Mate great tip. Excellent article and something I havent really considered about panning :

"They can also be used to capture fast-moving subjects in poor lighting conditions as the shutter speed require is necessarily relatively slow. "

Thanks for sharing :D

Mike
User avatar
ozczecho
Senior Member
 
Posts: 785
Joined: Sun Mar 13, 2005 9:41 pm
Location: Beecroft, Sydney

Postby nat on Sun Jul 23, 2006 9:50 am

Thanks for sharing you tips rmp.

As a relative beginner wanting to learn more, I am indebted to you and others who offer tips to help me learn new techniques.

This is what makes the forum such a great place. We should never lose sight of this.
User avatar
nat
Member
 
Posts: 161
Joined: Sun Aug 07, 2005 10:07 pm
Location: Gawler, South Australia

Postby gstark on Sun Jul 23, 2006 11:24 am

Robert,

Excellent work.

Except for the bit where you suggest that the driver stops for you while you achieve focus. I'm not too sure how well that works at a race meeting. :)

Seriously, if you like to put this together as a PDF article (have a look at our other tutorials from the front page) I'll be happy to add this to those so that all members may benefit from your expertise. Please feel free to PM me for further details.
g.
Gary Stark
Nikon, Canon, Bronica .... stuff
The people who want English to be the official language of the United States are uncomfortable with their leaders being fluent in it - US Pres. Bartlet
User avatar
gstark
Site Admin
 
Posts: 22901
Joined: Thu Aug 05, 2004 11:41 pm
Location: Bondi, NSW

Postby Yi-P on Sun Jul 23, 2006 1:11 pm

Cant we use AF-C and keep the focus selector to the left/right then pan along with the vechile and keep the shutter on frenzy mode?
User avatar
Yi-P
Senior Member
 
Posts: 3579
Joined: Mon Jul 25, 2005 1:12 am
Location: Sydney -- Ashfield

Postby makario on Sun Jul 23, 2006 5:14 pm

Excellent tips Thanks for posting, however I hv a couple of questions

1) Do you set the camera to AI SERVO mode (in canon) ie continuous focusing mode?
2) Do you turn Auto focusing on the lens off?

Cheers
Mak
User avatar
makario
Member
 
Posts: 389
Joined: Sun Feb 19, 2006 9:01 pm
Location: Keilor, Melbourne, VIC

Postby rmp on Sun Jul 23, 2006 7:58 pm

Thanks for the feedback guys.

Instead of addressing questions by reply I will expand the howto to address the answers in the next couple of days. As I mentioned there is plenty more on the topic which includes the areas you're asking about.
rmp
Member
 
Posts: 161
Joined: Mon Mar 27, 2006 8:29 pm
Location: Western side of Melbourne

Postby Raskill on Sun Jul 23, 2006 8:00 pm

Nice 'how to'. I read a good rule of thumb was to set the shutter speed at the 'miles per hour' speed of the vehicle you are photographing. Trent added that maybe you could try the same with Km's.
2x D700, 2x D2h, lenses, speedlights, studio, pelican cases, tripods, monopods, patridges, pear trees etc etc

http://www.awbphotos.com.au
User avatar
Raskill
Senior Member
 
Posts: 2161
Joined: Fri Jun 17, 2005 12:26 pm
Location: Rockley, near Bathurst, Home of Aussie Motorsport!

Postby Manta on Sun Jul 23, 2006 8:05 pm

Thanks Robert - good tips indeed.

I hope you can take up Gary's offer and I look forward to seeing your full 'report' as a PDF tutorial. Very helpful.
Simon
D300 l MB-D10 l D70 l SB-800 l 70-200 VR l TC 17-E l 18-70 f3.5-4.5 l 70-300 f4-5.6 l 50 f1.4 l 90 Macro f2.8 l 12-24 f4
http://www.redbubble.com/people/manta
User avatar
Manta
Former Outstanding Member Of The Year
 
Posts: 3815
Joined: Tue Nov 30, 2004 10:49 pm
Location: Hamilton Qld

Postby rmp on Thu Jul 27, 2006 9:06 pm

makario and Yi-p, your questions are now answered in the initial post.

I'll convert this to PDF when I've finished with it.

I find panning very useful but don't pretend to know everything there is about it, so contributions from others are welcome.
rmp
Member
 
Posts: 161
Joined: Mon Mar 27, 2006 8:29 pm
Location: Western side of Melbourne

Postby michael_ on Sun Aug 06, 2006 3:29 pm

awesome tips very helpful and informative, thanks for sharing.
User avatar
michael_
Senior Member
 
Posts: 605
Joined: Wed Aug 02, 2006 5:40 pm
Location: alexandria, sydney, nsw, au

Postby Alex on Sun Aug 06, 2006 4:04 pm

Thanks for the tip, Robert! Excellent.

Alex
User avatar
Alex
Senior Member
 
Posts: 3465
Joined: Thu Feb 24, 2005 6:14 pm
Location: Melbourne - Nikon

Postby Geoff on Sun Aug 06, 2006 4:59 pm

Fantastic article Robert - thank you! :)
Geoff
Special Moments Photography
Nikon D700, 50mm 1.4, 85mm 1.4, 70-200 2.8VR, SB800 & some simple studio stuff.
User avatar
Geoff
Moderator
 
Posts: 7791
Joined: Sat Aug 07, 2004 12:08 am
Location: Freshwater - Northern Beaches, Sydney.

Postby ziggy on Mon Aug 07, 2006 12:45 pm

Great article - unfortunatly I read it after I went to the races yesterday,

but I think I got a few things right, but still have my work in front of me, but not too bad for 1st attempt.

Bruce


Image
ziggy
Newbie
 
Posts: 18
Joined: Thu Jun 15, 2006 12:34 pm
Location: Ipswich Qld

Postby Bodak on Mon Aug 07, 2006 1:30 pm

This is great stuff, now to get out there and try it.
Life is

Stephen
Bodak
Member
 
Posts: 117
Joined: Mon Jan 09, 2006 5:31 pm
Location: Somerville Victoria

Postby cerkb on Thu Nov 02, 2006 7:42 am

Very good article but can't see the images. Have they been removed?
cerkb
Newbie
 
Posts: 14
Joined: Sun Oct 29, 2006 11:20 am
Location: MN, USA

Postby Yi-P on Thu Nov 02, 2006 8:32 am

cerkb wrote:Very good article but can't see the images. Have they been removed?


The article has been a few months old now, that can the reason of outdated images (removed).
User avatar
Yi-P
Senior Member
 
Posts: 3579
Joined: Mon Jul 25, 2005 1:12 am
Location: Sydney -- Ashfield

Postby moz on Thu Nov 02, 2006 11:55 am

Darn, just when I was nearly in a position to get hold of a car so I could try it. Bikes just aren't the same...

Image

From: http://www.moz.net.nz/photo/2006/10/21-messengers/[/img]
http://www.moz.net.nz
have bicycle, will go to Critical Mass
User avatar
moz
Senior Member
 
Posts: 937
Joined: Fri Mar 17, 2006 6:50 pm
Location: Coburg, Melbun.

Postby rmp on Thu Nov 02, 2006 12:41 pm

Sorry about that guys, I was clearing up my webserver and evidently got carried away. I'll put the images back shortly and convert it to a PDF like Gary asked me to ages ago!
rmp
Member
 
Posts: 161
Joined: Mon Mar 27, 2006 8:29 pm
Location: Western side of Melbourne

Postby cordy on Thu Dec 07, 2006 4:10 pm

Just to add to this, a monopod is really helpfull when you first start out learning to pan.. If no monopod, keep your arms tucked in to your body to steady yourself
cordy
Member
 
Posts: 340
Joined: Mon Mar 07, 2005 3:04 pm
Location: Canberra - Nikon D70 / Canon 20D

Postby Reschsmooth on Thu Dec 07, 2006 4:25 pm

I found this "How-To" awesome, techniques learned and used both at Oran Park, and in Adelaide (for this shot):

Image

The thing about this shot:

1. It was taken on my f90x (no big deal there).
2. I had spent the entire afternoon in an Adelaide pub, drinking Coopers Dark watching the Swans lose by a point to West Coast.
3. Instead of continually firing the shutter, I just pressed the shutter release once for this shot.

(Don't want to hijack the thread).

P
User avatar
Reschsmooth
Senior Member
 
Posts: 4164
Joined: Tue Aug 01, 2006 2:16 pm
Location: Just next to S'nives.

Postby rmp on Thu Dec 07, 2006 5:25 pm

Great pic. It would have been made easier by the fact that you were on the inside of an arc made by the cyclist, because then the subject is within the depth-of-field arc for longer. The ideal is to have the subject move in a precise circle at a constant speed with you at the centre. That's rarely possible though.

Reminds me to put the original pix back in the howto!
rmp
Member
 
Posts: 161
Joined: Mon Mar 27, 2006 8:29 pm
Location: Western side of Melbourne

Postby ekynox on Mon Dec 18, 2006 10:23 pm

Here are some of mine taken at a crit race in October. For me its simply AI Servo all the way no IS.

Enjoy !!

Image

Image
User avatar
ekynox
Newbie
 
Posts: 25
Joined: Sat Nov 11, 2006 3:18 pm
Location: Melbourne, Victoria, veeral.zenfolio.com

Postby Nafe on Wed Dec 20, 2006 9:25 pm

Use of corners can produce some decent results when panning. Remember to shift your focu point though :wink:

Image
Nathan Wong

Speed Shots Photography | http://www.speedshots.com.au
CAMS Accredited Photographer 06/07/08
Official Photographer of the Shannons Australian Production Car Championship | Supaloc Australian Saloon Car Series | Toyo Drift Australia Series
Nafe
Newbie
 
Posts: 10
Joined: Mon Dec 19, 2005 6:57 pm
Location: Sydney, Australia


Return to Tips and tricks

Who is online

Users browsing this forum: No registered users and 8 guests